Building the Hull: Overview
The assembly of the Emiliana’s hull is non-standard, so I have included some detailed instructions:
Why go to all of this trouble? When paper-modeling ships, getting the seams of the hull to fit tightly is always difficult. If you do a full-hull model, it is even worse. Actually, it is no wonder - you have irregular, curved surfaces meeting in three dimensions.
Because of the difficulty in getting tight fits, I am typically dissatisfied with most hull designs. So for the Emiliana, I set out to design the hull so that the parts would fit together perfectly. This requires a little complexity (and some sandpaper).
- The hull is built in three sections: Upper (D), Middle (T), Lower (M or L).
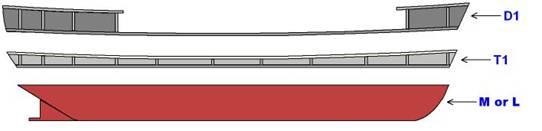
- There are two designs for the lower section of the hull (M and L). Choose one.
- The lower section of the hull (M or L) is made from solid paper which is sanded and then painted.
- The upper (D) and middle (T) hull sections are built using the normal “frame and skin” method. But they are designed so that the skin extends beyond the frame. After the skin is glued on, the skin is sanded back until it becomes perfectly flush with the top and bottom of the frame.
- Cutting out the frame pieces is never as exact as one would like and this generates fit errors. For the Emiliana, this is avoided by temporarily pre-assembling the frames and sanding the framework as a complete unit (so that everything matches up).
After sanding, the three sections are separated and finished separately.
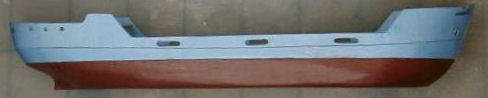
When complete, the hull will look like this (except for the color):
You have two choices for the lower hull section. You can build part L or part M. The difference is how the hull transitions to the fin where the propeller is attached.
The M-Hull has a concave surface (leading to the propeller fin) that will requires a ¼ inch sanding drum (like on a Dremel-tool). In the L-Hull, the propeller fin is glued on, so all surfaces are convex.
Use sheets A1, A2, A3, B, C/Cr for the L-Hull. Use sheets A4, A5, A6, B, C/Cr for the M-Hull.