Using Needles to help build the Anchor Winch.
The anchor winch assembly is designed to be built on a needle. The needle aligns the parts and holds them in place while the glue is applied and while the glue dries.
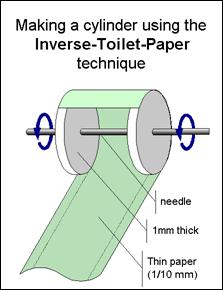
The "Inverse Toilet
Paper" technique
This technique is used for making cylinders (such as the subassembly 21bcd). The top and bottom of the cylinder (21b and 21c) are disks of 1mm paper (three laminated thick-sheets). But the cylinder-side (21d) is made from a strip on thin paper (1/10mm thick) that is wound onto the assembly (like the inverse of what you do with a roll of toilet paper).
The needle is inserted through the centers of the cylinder’s top and bottom pieces and holds them in place while the skin is wound on.
The "Disk-Stacking" Technique
This technique is used for the axle-assembly of the anchor winch. The axle-assembly is simply a series of disks, a cylinder, and some other pieces which need to be glued together so that their center-lines align. The needle makes this easy. It is pushed thru each center-line mark and the assembly is assembled right on the needle.
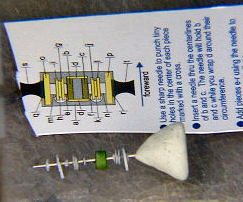
Notice that I have made a holder/handle for my needles from epoxy putty.
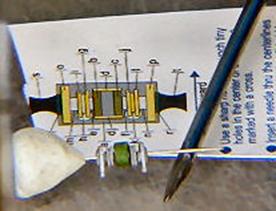
There is a problem that you will encounter here. The 1/16th inch disks are the weak link in this assembly because they will de-laminate. That is, the layers of the paper will separate. Paper is designed to be strong in the in the plane of the paper. But the internal strength binding the front to the back is extremely weak. When we stack disks, we are relying on the front-to-back strength of the paper. The 1/16th inch disks are not strong enough in the front-to-back direction. So these pieces need to be strengthened by hardening them with thin cyanoacrylate glue. It would be good to strengthen the 1/8th inch disks also.
Tip: The needle hole must be made in the 1/16th inch disks before they are hardened. Otherwise, they will split when the needle is inserted.