Building Deck-Railings Using Thread, Cyanoacrylate, and Railing-Jigs
The deck railings are
“thread-assemblies”; ie, they are made from thread
that is simultaneously glued together and hardened with cyanoacrylate
glue. Having good railings is crucial
for a good looking model so be sure to use this skill.
Since Deck Railings always have nice
right angles and straight runs, the easiest way to build them is to use a
“Railings-Jig”.
§
First, you need to make a jig:
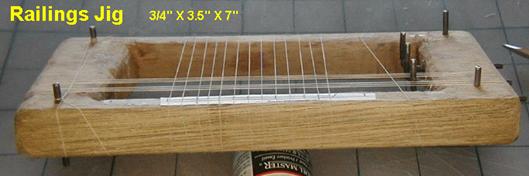
I made mine
(rather roughly) from a 7-inch piece of 1X4 mahogany board. I cut out the middle with a jigsaw and
rounded all of the corners with sandpaper.
I drilled
four holes (in each corner) and drove metal pins through so that the pins stick
out about 3/8 inch on both sides. (I
used brazing rod for the pins.) These pins are used for tying off the thread
(and they are really handy to have).
You can see
three more L-shaped pins attached to the inside. These are used as attach points for making
rat-line-rigging for sailing ships.
§
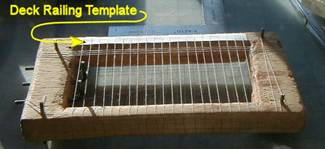
In the plans, there is a
template for each deck railing.

§
Cut it out and temporarily glue
it to the edge of the jig.
§
Wrap thread around the width of
the jig so that the thread matches the railing posts on the template.
§
Next, wrap the thread round the
length of the jig to make the rails.
§
Tie off the thread.
§
Now, push and slide the thread
around so that the thread position matches the template.
Most
railings (as is the case with the Torrini) have two rails. But, as shown in the pictures, I always wind
a third "rail" at the bottom of each railing. This railing is cut away eventually. But in the meantime, it makes it possible to
cut the bottom of the posts to exactly the right length.
§
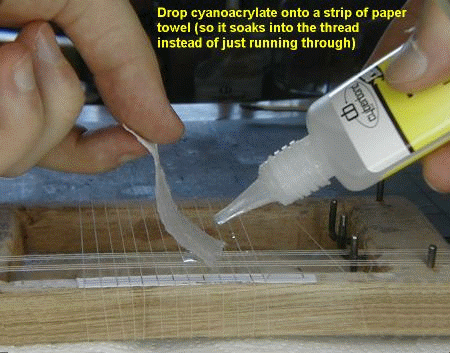
Next apply thin
cyanoacrylate glue to the assembly to glue the interstices together and to
harden the railings.
There
is a trick to avoid having the glue drop right though the jig: Hold a small strip of paper towel between the
dropper and the thread. Let it actually
rest on the thread. The drops are caught
by the strip of paper towel and are distributed to the thread.
§
Let the cyanoacrylate glue
dry.
§
Now check each interstice to
make sure that the threads are actually glued together. (There is the occasional miss). Re-glue such interstices with a toothpick
dipped in cyanoacrylate glue.
Now it is time to cut out the
railings. I use a small pair of sewing
scissors. There are four steps:
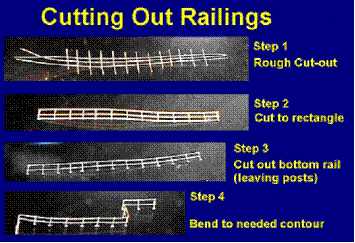
(This railing is
from the “Krakus”)
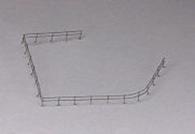
Here is the completed railing for the
boat-deck:
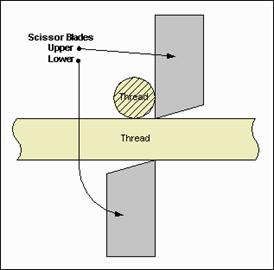
When doing the cutting, I find that
there is a particular way to place the railings against scissors that works
better.