Wet-Paper Techniques
Paper is wonderfully pliable when wet. There is no reason not to use this fine property of paper in doing paper models. Three wet-paper deformation techniques are called for in this model:
Making Concave/Convex Parts
Two sets of parts are meant to be wetted and deformed in order to make them concave/convex (the ends of the life raft canister and the reflectors for the cargo area lights).
The process is very simple:
|
|
§ Cut out the parts (which are simple disks). § Dip the parts in water briefly. § Allow to sit for five minutes to allow the water to penetrate the fibers. § Place the parts on a mouse pad (or other surface with give) § Press down with a narrowly rounded tool (such as the "other" end of a small paint brush) till the desired convexity is achieved. § Allow to dry. |
Making Parts Out Of Paper Worms
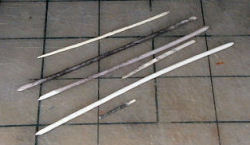
When you were a kid, you rolled worms out of modeling clay. You can do the same thing with wet paper and get similar results. These paper worms can be dried, colored/painted, hardened with cyanoacrylate, and used for masts, posts, and pipes.
Normally, people use metal wire or wood for these parts. I think using paper is cooler. When people exclaim, "This is made out of just paper?", you can truthfully say, "Yup".
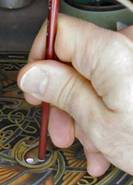
The basic approach is very simple
§ Allow a small strip of paper to soak until it starts to lose its form and turn back into a mush of paper fibers.
§ Add some water-based glue (to re-bind the fibers together).
§ Roll the paper-strip between your hand and any hard surface until a paper worm is formed.
§ Let the worm dry.
§ Color it.
§ Harden with cyanoacrylate.
There are lots of possible techniques to use. Experiment and see what works best for you. Here is what works for me:
§ I have made worms with strips of regular (1/10mm thick) printer paper. But it really takes a long while to soak them enough. So I have been lately using strips of paper towels. Paper towels turn to mush immediately. They work great!
§ How wide should the paper strips be? It all depends on what diameter of worm you want and what kind of paper you use. Start with 1/2-inch strips and see what diameter it produces. Then vary the width from there.
§ For me, I like to make lots of worms in varying diameters (rather than planning out exactly what I need.) I keep a little container with lots of worms. When I need one, I just pick through what I have.
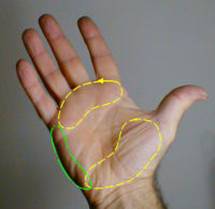
§ When rolling the worms, I don't use my fingers. Instead I use portions of my palms.
§ If the worm is two wet, it won't roll. Instead, it will slide. If this happens dab with a paper towel to remove some of the water. Or add more glue. Or just let the glue get a little tackier.
§ Your aim should be to get a constant diameter worm. You will never be entirely perfect. So make lots of worms and use the worms (or portions thereof) that come out the best.
§ You can sand cyanoacrylate-hardened worms: Replace the drill-bit on your electric drill with a worm. While the drill rotates the worm, pinch the worm with a small piece of sandpaper and move up and down the length of the worm.
§ Have fun! (You are rolling worms out of paper-pulp, for crissakes.)
Making Parts Out Of “Spit Wads”
Instead of rolling paper-pulp into worms, why not roll it into spheres? Use the same techniques as above
This model uses tiny spheres for the light bulbs for the cargo area lights (58).
The GPS-receiver (17b) on the equipment tower is a half sphere. For this one, after the spit-wad is dried and cyanoacrylate-hardened, sand half of it away. (This works better than cutting the sphere in half.)